Forum Replies Created
-
AuthorPosts
-
> 方法1の場合, 取得できる時刻はPC内の時刻だと考えております.
> 方法2の場合はどこの時刻を取得しているのでしょうか. また, NTPサーバーからの時刻の取得は可能でしょうかどのケースにおいても HARK を実行している PC のシステム時刻になります。
フレーム単位の時刻に関しましても PC が NTP で同期している場合は、取得した時点の時刻となります。
つまり、 HARK の実行中に NTP で大きな時刻修正が入ると時刻がジャンプしたり戻るなどが発生する可能性が御座います。> (方法1で行うとしたら, webカメラをPCに接続すれば簡易的に動画の時刻を取得できるかなと考えております.)
web カメラが PC の時刻に同期している場合は、 HARK が出力する時刻と一致します。
一方でネットワークカメラのように単体で時刻を保持する機器が NTP 同期をしている場合は、個々のデバイスで同期する時刻が僅かにずれる可能性が御座います。
なお、計算が面倒なことになるのでロケール(世界標準時なのか日本標準時なのかなど)の設定にはご注意ください。蛇足ですが、 AudioStreamFromMic ノードの出力端子の具体的な仕様は次の通りです。
もし、ノードの出力を直接扱う C++ のコードを書かれる場合は下記をご参照ください。- TIME 端子:
std::chrono::system_clock::time_point time; をメンバー変数として持つクラス Time() へのポインタが渡されている。
std::chrono::system_clock::now() から LENGTH – ADVANCE 分の時間を差し引いた値(フレームの末尾時刻)が設定されている。 - TIMESTAMP 端子:
struct timeval time; をメンバー変数として持つクラス TimeStamp() へのポインタが渡されている。
std::chrono::system_clock::now() から LENGTH – ADVANCE 分の時間を差し引いた値(フレームの末尾時刻)を timeval 型に変換した値が設定されている。
以上、宜しくお願い致します。
HARK Support Team.お問い合わせありがとうございます。
> 2つのマイクロホンアレイの音源定位結果から音源(牛)の二次元座標を特定したいと思っています.
目的は、三角測量のようにして対象音源座標の特定をされたいのであると理解しました。
> 「2つのマイクロホンアレイから出力された2つのcsvファイル」と, 「音源と2つのマイクロホンアレイが映るように真上から撮った動画」の3つのデータから, どの牛が鳴いているのかを特定したいと思っています.
状況として、動画データとの同期が必要な事から2ファイルの同期だけでなく実時刻が必要であると理解しました。
認識に誤りがございましたらご指摘ください。
> 質問1
> この3つのデータの時刻を同期させるために, HARKのネットワークの実行が開始された時刻(ネットワークの実行によりcsvファイルが作成された時刻)が必要だと考えましたが, この時刻を取得する方法はありますか?はい、ございます。幾つか手段があり、メリット・デメリットがございますので下記のいずれかからご選択ください。
-
1. 開始時刻を取得する方法 (中でも最も簡易的に取得する方法をご提案させて頂きます)
1-1. AudioStreamFromMic ノードの AUDIO 出力を SaveWavePCM2 ノードの INPUT 入力に接続し、ファイル名の時刻を参照します。(SaveWavePCM2 ノードの場合、ファイル名に作成時刻が入るためです。)
1-2. AudioStreamFromMic ノードの AUDIO 出力を SaveWavePCM ノードの INPUT 入力に接続し、ファイルの作成時刻(create time)を参照します。
デメリット:入力された音響信号の保存が不要な場合は無駄に容量を消費することになります。ファイル作成が開始直後の処理であるとはいえ、僅かに遅れがありますので厳密な開始時刻ではありません。ただし、次の影響の方が大きいと考えられます。長期間連続で稼働させる場合にはクロックずれ(後述)による影響を考慮する必要があります。
メリット:プログラムなどを組む必要もなく、時刻を得る手段としては最も簡単です。 -
2. フレーム単位の時刻を取得する方法
2-1. AudioStreamFromMic ノードに TIMESTAMP という名称で出力を追加し、 HarkDataStreamSender ノードの TIMESTAMP 入力に接続します。 HARK の実行後に HarkDataStreamSender ノードの PORT パラメータで指定されたポート(listen port)に接続すると TCP/IP 経由で情報が得られます。
補足情報: SourceTracker ノードの OUTPUT 出力を HarkDataStreamSender ノードの SRC_INFO 入力に同時に接続すると、フレームの時刻と定位結果を同時に送ることも出来ます。
HarkDataStreamSender ノードについての詳細は、 https://www.hark.jp/document/hark-document-ja/subsec-HarkDataStreamSender.html をご参照ください。
デメリット:TCP/IP の通信が出来るクライアントが必要となります。通信がテキストではなくバイナリで行われるため、 telnet ではなく Python などの言語でプログラミングが必要となります。セキュリティソフトのファイアーウィールで通信がブロックされた場合は、HARK のアプリまたは listen port の通信を許可するなどの手間がかかります。
メリット:リアルタイムに送られてくるデータを処理するプログラムを書けば、2つの定位結果を受け取りながら結果を計算して出力する事ができます。 TCP/IP 通信でデータを送受するため、ネットワーク上の別の PC に送って処理する事ができます。 -
X. 時刻を使用しない (ミリ秒精度が必要ない場合はこのような手段もありだと考えます)
X-1. 2台のマイクロホンアレイにおける定位結果を HarkDataStreamSender ノードで TCP/IP 経由で送信し、受信側のプログラムでは最新の受信結果のみをバッファしておきます。2台のマイクロホンアレイの最新の結果を使用して定期的に処理します。処理した時刻と結果を保存します。
デメリット:基本的に「2.」のデメリットと同様です。違いですが、リアルタイムにオンライン実行を行うデモや運用には向いていますが、再現実験のようにオフラインで同じ入力を元に走らせることが出来ません。処理の再現実験などを行う場合は計算に使用した座標データを自身のプログラム側で保存しなければならなりません。
メリット:基本的に「2.」のメリットと同様です。違いですが、2台のマイクロホンアレイ間のクロックずれ(後述)を気にせず処理が出来ます。長時間連続運用する場合には必要なデータ以外を保存しなくても良いため空き容量を気にする必要が無く向いています。
他にもいくつか手段は御座いますが方向性としては上記のいずれかの系統となります。用途に合わせてご選択ください。
> 質問2
> 質問1の開始時刻が取得できた場合, csvファイル中のフレーム番号と現実の時刻を同期させるためにはどうしたらよいでしょうか? サンプリング周波数は16000[Hz], フレーム長は512, シフト長は160です.サンプリングレートが 16000 [Hz] であるということは 16000 [samples/sec] ですので、また、シフト長 160 [samples] づつフレームが進むということになりますので、 1 [frame] あたり 10 [ms] に相当します。
HARK においてはフレームを 0 からカウントしますので 99 フレーム目の終端、または 100 フレーム目の開始の時刻が 100 * 10 [ms] = 1 [sec] 後となります。
ですので基本的には(*注1)2つのCSVファイルにおいて、フレーム番号の差が常に一定となります。*注1:マイクロホンアレイのA/D変換を行っている回路やHARKを動作させているPCなどに使用される水晶振動子(腕時計などでクォーツと呼ばれる素子)は ±30ppm や ±50ppm などのように単位が ppm (100万分の1) と非常に精度が高いものですが、長期間継続的に使用する場合には少しづつ誤差が累積します。つまり、2台のマイクロホンアレイ間でのクロックずれがフレームカウントに影響します。
例えば ±50ppm とはどういう状況かですが、 16000 [Hz] * 1.00005 = 16000.8 [Hz] ~ 16000 [Hz] * 0.99995 = 15999.2 [Hz] であるため、最大と最小の差は 1.6 [Hz] あります。2台のマイクロホンアレイ間で最大と最小の誤差を持つ個体であった場合、 100 [frames] = 1 [sec] 後には 160 [samples] = 1 [frame] = 10 [ms] 分のずれが発生します。少ないと言いつつも数日継続的に動作させる場合は結構な差となります。腕時計などでも電波時計のように定期的に時刻調整を行っているもの以外では、数か月使用していると時刻を分単位で合わせる必要があるのはこのためです。
長期的に連続稼働させる場合は、開始時刻だけではなくフレームの実時刻で処理した方が良い場合もございます。ご不明な点がございましたらご連絡ください。
以上、宜しくお願い致します。
HARK Support Team.-
This reply was modified 1 year, 11 months ago by
Masayuki Takigahira.
-
This reply was modified 1 year, 11 months ago by
お問い合わせありがとうございます。
第10回から使用されている収録データのため、第10回HARK講習会資料の該当箇所の画像を引用して添付いたします。
仰る通り、-60度, 0度, 60度の方向に音源が存在します。画像をご参照ください。
音源は、話者が実際に発話しています。 (スピーカー再生ではないため、方向に若干のブレがあります。)元がかなり古いデータですので詳細をすぐにお調べするのが難しい状況ですが、私の把握している限りではマイクアレイの周囲を回っているという認識はございません。
恐らくですが、実際の話者の発話であることから発話の開始、終了タイミングがバラバラであり、顔の向きなどのブレにより方向が若干揺れていることなどが影響し SourceTracker ノードが別方向の話者の定位結果と繋げてしまったことが要因ではないかと考えられます。
SourceTracker ノードは特定話者や特定方向の音源を追跡する機能ではなく、近い音源を検出すると継続音源とみなして追跡する機能ですので、該当する定位した音源の消失前に近い方向で音源が見つかると追跡してしまいます。つまり PAUSE_LENGTH 期間中に新たな音源が見つかると繋がります。 (*1)
ConstantLocalization ノードを使用して Azimuth を -60, 0, 60 固定で分離することで同一方向の音を常時分離する事が可能ですので、特定方向の話者の音声のみを分離することが可能です。*1) 極端な例を挙げると、下記のようなケースの場合は別の近傍方向の音源にずれて繋がる可能性があります。
↑ Degree
───┐ └───
───┐ └───
───┐ └───
—> Time以上、宜しくお願い致します。
HARK Support Team.-
This reply was modified 2 years ago by
Attachments:
お問い合わせありがとうございます。
マイクアレイデバイスを複数台使用されたいとのことですが、マイクアレイデバイス同士が同期して録音出来る必要があります。同期は、各マイクアレイデバイスのクロックが僅かにずれるためサンプルのずれをどこかで調整する必要があるためです。
目的によっては他にも最適な解決手段がご提案できるケースが御座いますが、汎用的な解決手段として下記があります。
1つの解決手段として ALSA などの仮想ミキサー機能を使用して複数台のマイクアレイデバイスを1台の仮想マイクアレイデバイスとする方法が御座います。
下記はご質問者様と似たようなケースで、2台の2チャネル録音デバイスを1台の4チャネル仮想録音デバイスに見せる方法の回答が掲載されています。
https://stackoverflow.com/questions/8043912/is-it-possible-to-capture-both-mic-and-line-in-at-the-same-time-using-alsa
上記URLの例では、 hw:0,1 や plughw:0,1 などの物理デバイス名の代わりに multi_capture というデバイス名を指定することになります。
ALSA のユーザ設定は、 .asoundrc というファイルに記述することになりますので、使い方など検索される際のキーワードとして .asoundrc や ALSA などをご利用ください。英語で分かりづらい場合でも検索をかけて頂ければ下記のような和訳サイトなどが見つけられます。
https://wikiwiki.jp/tetsuya/asoundrc1台のデバイスとして見える状態になりましたら、 AudioStreamFromMic の出力を ChannelSelector で8チャネルづつに分割して処理して頂く事で、1ループ (LOOP0のシートのみ) で2台のマイクアレイの処理を行う事が可能です。
その他の解決手段について:
各マイクアレイの処理が独立したものであるならば、2つのHARKプロセスで別々に処理する事をお勧めいたします。
例:2つのマイクアレイで定位された方向で三角測量のような事を行いたい場合
1.2つのHARKプロセスを起動し、各プロセスから最新の定位結果を送信する
2.定位結果を受信し、測量結果を求める
とすることもできます。ご検討ください。以上、宜しくお願い致します。
HARK Support Team,-
This reply was modified 2 years, 1 month ago by
-
This reply was modified 2 years, 1 month ago by
> 音声ファイルが30チャンネルのWAVファイルであることが原因で、
はい。30チャネルの入力の場合には HARK をソースコードからビルドし直す必要がございます。
現在公開しているパッケージ版の HARK では、扱えるチャネル数や音源数などに上限がありそのままでは処理できません。上限を変更するためには、ソースコードを一部書き換えて再ビルドする必要がございます。
ビルドする前に、
hark-coreパッケージのlibseparation/MICARY_def.hファイルに記述されているマクロ定義__MICARY_def_MAX_NCHおよび__MICARY_def_MAX_NSRCの値を変更してください。上限ですので今回は 16 から 32 などに変更する必要がございます。
libseparation という名称ですが、分離以外のノードでも参照されているため変更が必要となります。
例えば、お使いのネットワークの場合 Beamforming ノードでも使用されています。具体的なビルド方法につきましては、 Installation from Source Compilation の Step5 : hark-core installation instruction をご参照ください。
PyHARK ではリファクタリングされており、この制限が無く再ビルトが不要です。
以上、宜しくお願い致します。
HARK Support Team.-
This reply was modified 2 years, 3 months ago by
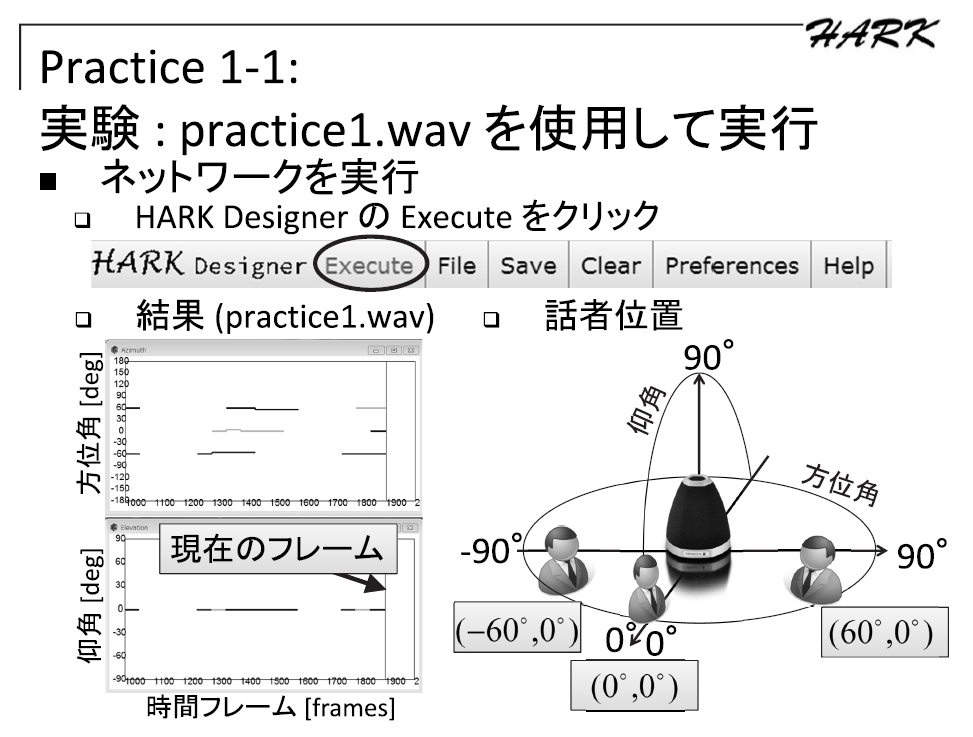
頂いたノード (定位結果を CSV ファイルに出力する Python ノード) の実装を用いて Ubuntu がインストールされた VM 上で動作の確認をさせて頂きました。
結果が得られないという状況が再現できず、定位結果が正常に CSV ファイルに保存されていましたので下記についてご確認ください。1. “all” などの出力端子が MAIN (LOOP を置いている subnet) でも出力端子が設定されていること。
これが行われないとノードが実行対象から除外されている可能性があります。2. DisplayLocalization ノードの代わりに SaveSourceLocation ノードなどでファイル出力を行う。
XML 形式で読みづらい出力ファイルとなってしまいますが、ファイルは確実に出力されますので定位が出ているか否かの確認が出来ます。Python ノードに起因する部分を無視できますので、ここで定位結果が得られない場合は定位が出来ていない可能性が御座います。3.CSV ファイルの出力先のアクセス権をご確認ください。
書き込み禁止の場所で実行しますとファイルが生成されない事が御座います。4.下記のサンプルで結果が得られることをご確認ください。
下記の URL に我々が提供しているサンプルが御座います。
https://hark.jp/download/samples/
下記のサンプルファイルをダウンロードして頂き、
https://hark.jp/networks/HARK_recog_3.0.0_practice2.zip
本投稿に添付している patch.7z の内容を上記サンプルのディレクトリ内に展開します。
export OPENBLAS_NUM_THREADS=1 && ./sep_rec_offline_loop_wo_disp_write_csv.n
のように実行して頂くと、処理が行われ 999.py の結果が output.png にあるような内容で出力されます。
最初の環境変数設定はコア数の多いPCで処理速度が落ちないようにするために設定していますが、無くても実行は可能です。5.以上の対処で解決が出来ない場合は、実行環境の HARK を最新版に更新することをご検討ください。HARK 講習会などで使用している既に HARK がインストール済みの VM イメージを一般公開しております。下記の URL の「第22回HARK講習会用のファイル一式の URL」から VM イメージを取得する事が可能です。
https://www.hark.jp/document/tutorial/2023/practice0.html———-
DisplayLocalization を接続すると Python が応答なしとなる件について:
原因は Python の GIL に起因するもので複数の Python ノードを使用している場合に UI を描画するノードを使用すると処理が重い場合に応答なしのダイアログが表示されるという状況が発生していることが分かりました。ダイアログを「キャンセル」で閉じると処理が継続されますが、頻繁に停止してしまうことから描画系のノードは使用を控えてファイル出力などでご対応頂けないでしょうか。
PyHARK では各ノードをマルチスレッド・マルチプロセスで処理を行っておりますので PyHARK に移行して頂くことでも回避が可能です。もし PyHARK にご興味が御座いましたら、下記 HARK 講習会の資料でも紹介しております。 practice3 が PyHARK の紹介となっております。
https://www.hark.jp/document/tutorial/2023/practice0.html
https://www.hark.jp/document/tutorial/2023/practice1.html
https://www.hark.jp/document/tutorial/2023/practice2.html
https://www.hark.jp/document/tutorial/2023/practice3.html以上、宜しくお願い致します。
HARK Support Team.-
This reply was modified 2 years, 3 months ago by
-
This reply was modified 2 years, 3 months ago by
-
This reply was modified 2 years, 3 months ago by
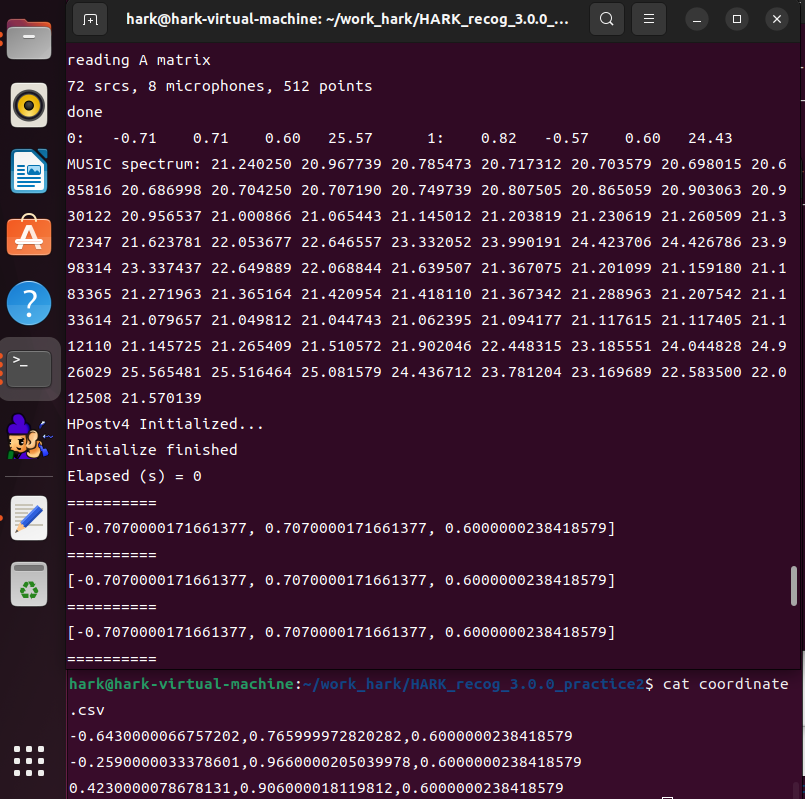
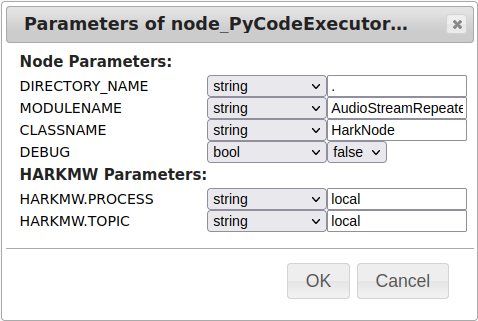
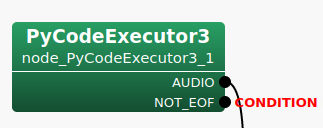
回答が遅くなり申し訳ございません。サンプルを作成致しました。
添付ファイルの Python ノードを LOOP0 の中にある AudioStreamFromMic や AudioStreamFromWave の代わりに使用して頂くとご希望の動作になると考えております。
MAIN には LOOP0 のみ存在し、また LOOP0 については出力端子のみとなるネットワークになります。InputStream ノードなどは必要なくなります。まず、 PyCodeExecutor3 ノードに出力端子 AUDIO と NOT_EOF を追加してください。AUDIO 端子の出力を AudioStreamFromXXXX ノードの出力と同様に接続して頂き、NOT_EOF 端子の出力に CONDITION を設定します (Set as Condition) 。 AudioStreamRepeaterFromWave.png のようになります。
また、必須ではないのですが NOT_EOF 端子に対して Set as Output で出力端子としても設定して下さい。これは HARK-Designer の不具合なので動作には影響がないのですが、入出力が設定されていない任意の端子(接続が必須でない端子)が存在する場合、次回ネットワークを開いた際に端子が非表示になるという問題を避けられます。
次にパラメータの設定を添付の AudioStreamRepeaterFromWave_parameters.png のように設定します。AudioStreamRepeaterFromWave.py (zipで圧縮して添付しています) の実装の概要ですが、
load_file メソッドは単独のファイルを読み込んで AudioStream のためのバッファ self.frames を作成します。 self.frames.shape は (frames, channels, length) で calculate メソッドの実行時(各フレームの処理時)に (channels, length) サイズの numpy.array() を出力するために使用します。 2次元配列は C++ 側で HARK::Matrix として変換されるため AudioStreamFromMic や AudioStreamFromWave の出力と同様の形式で出力されます。
load_files メソッドは複数ファイルを連結して読み込む例として実装させて頂きました。AudioStream のバッファをどのように結合するかの参考になれば幸いです。チャネル数やフレーム長(length)が変わる場合にはバッファを再構築する仕様で実装しております。添付の Python ノードをご使用になる際の注意点として、 sliding_window_view を使用しておりますので numpy の 1.20.0 以降が必要となります。
以上、宜しくお願い致します。
HARK Support Team.-
This reply was modified 2 years, 4 months ago by
お問い合わせありがとうございます。
Network file (.n 拡張子のファイル) が停止するタイミングは、 CONDITION を設定している出力端子に False が設定された時点となります。AudioStreamFromWave の場合を例に挙げますと、WAVファイルの終端(EOF)に達した時点で NOT_EOF 端子が False となり停止いたします。AudioStreamFromMic の場合はマイク入力ですので常に NOT_EOF 端子が True が設定されており、 Ctrl + C などで停止しない限り動作し続けます。
CONDITION は iterator 設定のサブネット (LOOP するための Dynamic ノード) の終了条件を示し、該当する iterator 設定のサブネット内に1か所だけ設定可能です。2か所目を設定しようとすると最初の設定が外れて排他的に設定されます。 Bool 値の出力端子であればどこにでも設定可能です。(非推奨ですが、 Int 値の出力端子の場合も動作し、0=False、0以外=Trueとみなします。)
外部からの Ctrl + C や kill signal 送信をトリガーとして停止したい場合は、 Constant ノードなどで True を固定値として入れて CONDITION を設定します。
PyCodeExecutor で実装されているノードが読み取るファイルをリストのようなもので処理していて、最後のファイルを処理し終えたことが分かっているようなケースでしたら NOT_EOF や NOT_END など分かりやすい端子名の出力端子を追加し、 Bool 値で True を終了させたいタイミングで False としてください。この端子に CONDITION を設定します。
複合条件で停止させたい場合は、各ノードの CONDITION 状態 (Bool 値) を出力する端子を AND ノードや OR ノードの入力に接続し、出力端子に CONDITION を設定することも可能です。 つまり、 (A AND B) OR C という状態で停止させることも可能です。
iterator 設定のサブネットが多重化されている (入れ子状態の) 場合、上位階層へ CONDITION を通知するために CONDITION の端子を該当の iterator 設定のサブネットで OUTPUT し、上位階層のサブネットで配置した LOOP の Dynamic ノードの出力値 (CONDITION の値) を読み取ってください。
つまり、 CONDITION が設定される出力端子は単なる Bool 値の出力端子で CONDITION として設定されることで LOOP 停止条件となると覚えるのが分かりやすいのではないでしょうか。設定されていない端子の状態は未接続の出力端子と同じ扱いとなりますので無視されます。
ご不明な点がございましたら、いつでもご返信ください。
以上、宜しくお願い致します。HARK Support Team.
追加情報ありがとうございます。
> > 通常の環境であれば、インパルスのピーク波形(大きな振幅)の後に残響(小さい振幅が減衰して続く)が出ていれば問題ないはずです。
> と変身をいただいたのですが見る限りだと後ではなく先に残響が出ている気がするのですが大丈夫でしょうか?time.png を拝見しました。インパルス波形以外に若干振幅が出ていますが振幅も小さく残響ではないようです。残響の場合は、インパルスの後に減衰しながら振動する波形が出ます。収録環境によるのですが、 time.png の画像からは殆ど残響がない空間で収録をされているように見えます。
> それと一応過去この部屋で録音した伝達関数も添付していおいたのですが同じ部屋でこれほどに伝達関数が変化することはあるのでしょうか?
kakonomono.png と frequency.png を拝見しました。収録環境やマイク、スピーカの特性により frequency.png のような状況になる可能性はあるのですが、今回は何らかの問題が起きていると考えられます。まず、 frequency.png の5kHz以下の振幅が殆どみられません。収録されているお部屋が同じであるとのことですので、マイクやスピーカ、アンプ等の機材の変更などある場合は特性が違うということになるのですがバンドパスフィルタがかかったかのような極端な波形となっています。
何点か確認させて頂けないでしょうか。
・1点目
transfer_function.png で TSP Offset や Mouth TSP Start が 48384 となっていることを確認しました。TSPはダウンサンプリング後のPCMファイルを HARKTOOL に入力されているという認識ですが違いますでしょうか。また、初期値が 16384 になっていたはずですが変更されましたでしょうか。TSP Offset が行われる理由は繰り返し再生するTSPの最初の1回分(16384サンプル分)には残響が含まれない為です。複素回帰モデルで作成する場合は音が含まれている区間を指定するだけなので影響が少ないですが、通常の同期TSPの場合は加算平均を行うため残響が含まれない1回をスキップしています。・2点目
Mouth TSP Start ~ Mouth TSP End の区間が 16384 サンプル分となっていましたが、TSP1回分(16384サンプル分)だけの区間に設定されている理由(例えば収録中に雑音が入ったので雑音の無い区間だけにしたなど)がございますでしょうか。TSPは16回繰り返して再生しているため長めに例えば 10 回分の 163840 サンプル分ぐらいの範囲で設定された方が精度が上がります。・3点目
前回伝達関数を作成された際 (kakonomono.png) の収録時点から今回の収録で変更のあった部分について差し支えない範囲でお伺いしても宜しいでしょうか。例:部屋の壁面に吸音材を貼り付けた、機材を**から**に変更した、など。また、1~2方向分だけで良いので収録されたTSPのオリジナル(ダウンサンプリング前)のWAVファイルを頂く事は可能でしょうか。以上、宜しくお願い致します。
座標系が90度方向で正面(*1)となっているようでしたので、その部分だけ注意が必要ですが頂いた内容から判断する限り伝達関数自体は問題ないのではないでしょうか。
*1) マイクアレイを前後の縦長に配置してマイクアレイの左側だけで音源を収録されたのであれば座標系は0度が正面になっています。その場合は、以降の内容で座標系の回転の話については読み飛ばしてください。
> harktool5のドキュメントに乗っている画像のものとはかけ離れたようなものなのですが、
マイクアレイ形状、環境などが全く異なるので掲載画像と異なること自体は問題ございません。
> 16chの一直線型のマイクロフォンアレイを使用し、
マイク間が 3cm の等間隔で 16個 並んでいるという設定に見えますが相違なければ大丈夫です。
ただ我々が想定している HARK の座標系において、マイクの配置方向が想定と異なっているように見えます。
4.5 HARK 標準座標系 にあるように、我々の想定では X=1.0, Y=0.0, Z=0.0 がマイクアレイの正面方向(0度方向)という想定で HARK を使用しております。
microphones.png を拝見する限り、マイクが左右に長く並んでいるのであれば座標系が90度回転している(我々の想定では正面が0度:X=1.0が正面、yuito様の座標系では右が0度で正面が90度:Y=1.0が正面)となっていること以外は問題が無いように見えます。角度の定義を90度読み替えて頂ければ現状のままでも問題はございません。> TSP信号は場所の都合上0度から150度で5度ずつで録音しております。
マイク配置でもお伝えした通り、90度座標系が回転しているようでしたので 0度(マイクアレイから見て右)から150度(マイクアレイから見て左やや前方)の範囲の音源位置で収録された音源であれば問題ございません。90度が正面となりますのでご注意ください。
soundsource.png の内容ではそのようになっています。
マイク配置の座標を修正して正面が0度となるように回転させる場合は、音源位置の座標も同じく回転させてください。> 録音機器の都合上、録音はサンプリングレート48kHzで行いsoxを利用して16kHzにダウンサンプリングしており、16kHz,16bit integerの物を使用しています。再生している音源に関しては16386.little_endian.wavを17回連続で再生するものを使用しています。
収録されたTSPを見る限りでは問題は起きていないようです。sox と HARK のダウンサンプラーのアルゴリズムに差がある可能性も考慮すると HARK で収録した方がベターですが波形やスペクトログラムを見る限りでは特に問題は無いように見受けられます。
> 伝達関数についてこれで正しいのかという点です。
kekka.png ですが、 Domain を周波数ドメインから時間ドメインに変更して頂くことでインパルス応答の時間波形となりますので正常に変換されているか確認しやすいのではないでしょうか。また、その際に TF type を Localization ではなく Separation に切り替えて頂くことで残響を含めたインパルス応答波形となります。定位には直接音のみを使用するため残響部分がカットされています。
通常の環境であれば、インパルスのピーク波形(大きな振幅)の後に残響(小さい振幅が減衰して続く)が出ていれば問題ないはずです。> この様な場合新たなトピックを建てるのがよいのか分からなかったので返信させていただきました。迷惑であれば申し訳ありません。
前回から継続のお問い合わせ、前回と関連するお問い合わせなどでしたら、返信、新規どちらでも問題ございません。時間が空いても前回の話と関連する場合は返信で問題ございませんのでお気軽にお問い合わせください。
複数件のお問合せや、別件のお問合せなどの場合は分かりやすいタイトルを付けてトピックを分けて頂くことでご質問内容ごとの回答となり後で見る際に内容を追いやすく、同じ内容でお困りの方の助けとなりますので新規のトピックで建てることもご検討ください。以上、宜しくお願い致します。
-
This reply was modified 2 years, 6 months ago by
お問合せありがとうございます。
> tsp信号は同期録音ではないため各音源ごとに多少のずれがあります。
問題ございません。HARKTOOL5の下記のURLにある機能を使用して頂き、音が含まれる区間(start ~ end)を指定して頂くと伝達関数を作成できます。「Use TSP record Files」となっているところを「Use Mouth TSP Record Files」に変更すると設定用の項目が表示されます。
複素回帰モデルを用いた伝達関数推定> tsp信号はharkダウンロード時に得られるものを
「ダウンロード時に得られるもの」というのは下記のファイルという事で合っていますでしょうか。
/usr/share/hark/16386.little_endian.tsp または
/usr/share/hark/16386.little_endian.wav> 再生環境に合わせ変換したものを使用しておりrate:48000,float32bitのものを使用しました。
再生については制限がありませんが、収録するTSPは 16bit integer または 24bit integer の WAV ファイルで収録をお願いします。また、「再生環境に合わせ変換」とありますが、具体的にはどのように行われたのでしょうか。
アップサンプリングを行っても16kHzの入力(ナイキスト周波数の8kHzまでの音)までしか分離する事が出来ません。また、再生するTSPがアップサンプリングにより歪みますので音声などが目的の場合で16kHzでも十分な場合にはTSP信号自体をアップサンプリングするのではなく、16kHzのままで再生して頂いた方がベターです。再生デバイスは通常、複数のサンプリングレートに対応していますので16kHzのままでもファイルを再生できるはずです。音声の定位や分離が目的である場合は16kHzで十分に機能しますので、次のケース1または、ケース2のどちらかの方法で対応してください。
音楽や電子音など高周波数帯域の定位や分離も行いたい場合は、ケース3の方法で48kHz用のTSP信号で対応してください。その場合、音声認識に関しては通常16kHz(あるいは8kHz)用にモデルが作られているため、そのままでは音声認識が出来ない事に注意して下さい。
*) 我々が提供しているKaldiのモデルは16kHz用です。ケース1:16kHzで収録し、16kHzで処理する。
音声のみを対象としている場合は、こちらの手順を推奨します。
TSP収録時のマイク設定を16kHzにした状態(*)で収録して頂き、HARKで処理を行う際も16kHzで使用する。
伝達関数は16kHzで作成したものを使用します。
*) マイクデバイスが対応していれば、サンプリングレートを変更して収録が可能です。
arecord などでは -r オプションで収録するサンプリングレートが指定できます。ケース2:マイクの設定は48kHzのままで、収録時とHARK処理時にDownSamplingし、16kHzで処理する。
マイクが16kHzでの収録に対応していない場合はこちらの手順で16kHz対応のマイクと同様に処理できます。
HARKで「AudioStreamFromMicノード」の後に「MultiDownSamplerノード」を接続して48kHzを16kHzにダウンサンプリングする事が出来ます。TSP収録を「AudioStreamFromMic、MultiDownSampler、SaveWavePCM」という接続のネットワークで行って頂き、HARKで定位/分離処理を行うネットワークでも同様に「MultiDownSamplerノード」を挿入して頂く事で16kHzとして処理できます。
伝達関数は16kHzで作成したものを使用します。ケース3:
音楽や電子音のように高い周波数を含む48kHzの入力(ナイキスト周波数の24kHzまでの音)を分離したいという要望であれば、下記のURLにあるように48kHz用のTSP信号を使用する必要があります。
Recording TSP
HARKTOOLで不具合が発生する場合は、GUIを使用せずコマンドラインから作成しなければならない場合があります。エラーなどが発生しましたら再度ご連絡ください。> 伝達関数を生成するサンプルのtsp録音データなどがあれば頂けると幸いです。
サイズが大きいため公式サイトからのダウンロード提供は今まで行っておりませんでしたが、公開しているTAMAGO03の伝達関数を作成する際に使用したTSP収録データはございます。
ただし、こちらは16kHzで収録したデータになります。16kHz以外の例えば48kHzでのサンプルとなりますとご提供可能な(公開可能な)収録データがございません。
TAMAGO03用(16kHz)で宜しければ下記からダウンロード出来ように致しました。
TAMAGO03 TSP recording data
サイズを小さくするため 7-zip 形式で圧縮しておりますので、下記のように 7-zip を入れて頂いてから展開して頂けますでしょうか。sudo apt install p7zip-full 7z x tsp.7z以上、宜しくお願い致します。
HARK support team.Thank you for your inquiry.
Q.1
But I don’t know how to record the TSP response, mainly because I don’t know how to run wios and I don’t know how to make the loudspeaker output the TSP even after reading and watching the tutorials you have.A.1
From HARKTOOL5, we have provided a method to create a transfer function from recorded data whose playback and recording are not synchronized. In other words, instead of wios, you can record TSP with a combination of common playback tools (such as aplay) and recording tools (such as arecord).Please refer to the following URL for the information necessary for setting to use the transfer function creation algorithm newly provided in HARKTOOL5.
https://www.hark.jp/document/packages/harktool5-gui-en/harktool5-gui.html#fd-conv-label
Below is an example command to play a TSP for 60 seconds with the default playback device.
sox /usr/share/hark/16384.little_endian.wav tsp_60sec.wav repeat 59
play tsp_60sec.wav &
You can prepare the recording data by the following steps.
1. Keep playing the TSP repeatedly in the direction of the sound source you want to record.
Notes:
It’s best if you have a monitoring speaker with a constant frequency response, but if you pay attention to the following points, you can use a normal speaker.
・In general, if the volume is lowered or raised too much, distortion will occur depending on the characteristics of the amplifier. It is better not to go below 20% or above 80%.
・It is better to use PC speakers with a certain diameter instead of small speakers built into smartphones. You can also take the approach of connecting a good quality speaker to your smartphone.
・For PCs, software effects (theater mode, etc.) attached to the Audio chipset may be enabled, and for smartphones, the vendor’s own virtual high quality technology may be enabled, so please turn it off.2. Record the TSP of “1.” in multi-channel with your microphone array. Any recording software can be used, but it is recommended to select a sampling frequency of 16 kHz in order to use HARK with the default settings.
Notes:
Respeaker has a function to output 1ch data after beamforming, but please record all channels of raw PCM without using the beamforming function. It’s a good idea to record at least 20 seconds per direction.3. Repeat “1.” to “2.” for multiple sound source directions. Be sure to record the direction of the separation target.
Notes:
Please adjust the speaker volume and microphone sensitivity to avoid clipping. Do not change the speaker volume and microphone sensitivity once determined, and use the same settings in all directions. Be especially careful if you have speakers close to the microphone array.Regarding the distance between the speaker (sound source) and the microphone array:
Place the loudspeaker at the sound source position of interest to be localized or isolated. For voice, the speaker should be positioned close to the mouth of the person speaking. The conversational robot will be about 1m, but if you are sitting on a seat and talking to a PC, it will be about 30cm. No minimum distance is specified, but be careful not to clip.4. After recording is completed in all directions, select a section containing sound and select at least 10 seconds or more (eg 16 seconds) to cut out. You can use any software to cut out, but please be careful not to convert the output format. With software such as sox, if you specify only the start time and length with the trim command, the format is preserved.
Notes:
For ease of setting in HARKTOOL5, it would be better if the PCM data for each direction has the same length. Also, since the space reflection sound is not included immediately after the start of the section containing the sound, it is better to start cutting out about 1 second after the start of the section containing the sound, not immediately after the start. . However, if the reverberation continues for a few seconds in a hall, etc., shift the extraction start point according to the reverberation time so that the section that fully includes the reflected sound is extracted.Q.2
And I would like to know if there is a minimum distance between the loudspeaker and the microphone array when the response is being recorded?A.2
As shown in the steps above, there is no minimum distance if you are careful with clipping. However, if the microphone array is placed directly on a table, it can be adversely affected by table reflections. It can also pick up table vibrations. If it is judged that there is an adverse effect, consider floating the microphone array with a tripod or the like.Q.3
The location where the recording is made is complex with obstacles, what is the minimum number of TSP recordings that you recommend around the microphone array?A.3
If the sound source position is fixed, the only mandatory source direction is the direction where the source to be separated is located. The sound source positions do not have to be evenly spaced. The sound source is not limited to the object such as voice, but also includes noise from a specific direction if you want to remove it by separating it. Also, it is necessary to record in a positional relationship where the sound reaches the microphone array directly. When recording TSP, be careful not to place any obstacles between the speaker and the microphone array that would block the direct sound arrival.As is concerned, in environments where the transfer function varies significantly with azimuth change (e.g., environments with many obstacles or rooms with complex shapes), the transfer function may not match when deviating from the known source direction, degrading the separation performance. There is no problem with simulations that synthesize inputs, but when performing live demonstrations, it is recommended to also create a transfer function for a position that is 5 to 10 degrees off the original position of the sound source. By creating such a transfer function, even if the speaker’s position deviates a little, the SourceTracker node can track the movement of the nearby sound source.
The transfer function we provide is created with 72 directions in 5 degree units for 360 degree omnidirectional moving sound source tracking assuming that the speaker walks around the robot. On the other hand, in an environment where you know there are speakers at 15 and 45 degrees, it’s fine to restrict the orientation of the transfer function to just the directions in which the speakers are. For example, 10, 15, 20, 40, 45, and 50 degrees may be enough, assuming that the position of the speaker is slightly off. Even with such a direction-limited transfer function, it is possible to separate speaker A at 10 to 20 degrees and speaker B at 40 to 50 degrees. Of course, if you take the solution of telling the speaker A and B to stay at a point marked as the sound source location when doing the demo, then we don’t need additional TSP recordings in the vicinity of the assumed sound source.If you have any questions, please feel free to contact us.
Thank you.Best regards,
HARK support teamお問い合わせありがとうございます。
iGEVDは雑音相関行列を逐次的に変化させるという認識で合っています。追加パッケージは不要です。
直前(指定したフレーム前)の相関行列を雑音相関行列とみなすことで実現します。仰る通り、作成済み雑音相関行列を CMLoad ノードで読み込む代わりに CMMakerFromFFT または CMMakerFromFFTwithFlag ノードで相関行列を生成しながら LocalizeMUSIC ノードの NOISECM 端子に与えるネットワークにします。
ここで注意点として、INPUT 端子へ入力する信号と NOISECM 端子へ入力する雑音相関行列を同じフレームから生成してしまうと自分自身を WhiteNoise 化してしまうため MUSIC スペクトルでピークが出なくなってしまいます。そのため、 Delay ノードを挿入して入力フレームをずらす必要があります。
HARKの仕様として、 Delay ノードに与える遅延量は負値で与える必要がありますのでご注意ください。正値で入力した場合、後段ノードに対して入力が揃っていない状態で計算指示を出している意味になりクラッシュします。負値の場合は、後段ノードに先行フレームなのでバッファに保持しておいてくださいという指示になり、後段ノードの計算開始タイミングをずらすという処理となります。iGEVD-MUSIC の場合は LocalizeMUSIC のパラメータを GEVD に、iGSVD-MUSIC の場合は LocalizeMUSIC のパラメータを GSVD に設定して下さい。
iGEVD/iGSVD いずれの場合も継続音がある場合は雑音として扱われてしまうため、人間の声で「あーーーー」と言い続けていたり電子音で「ピーーーー」と鳴り続けている場合には音の出始め部分だけピークが出て、あるフレーム以降はピークが消えます。
検出したい継続音がある場合は、 Delay ノードの遅延フレーム数と CMMakerFromFFT ノードや LocalizeMUSIC ノードのウィンドウサイズを調整して頂くと解決できる場合があります。ご不明な点がございましたら、コメントでご返信ください。
以上、宜しくお願い致します。
HARK Support Team.Yes, the correct way is to adjust the MultiGain connected after AudioStreamFromMic. To check the amplitude of the separated sound, check the output of SaveWave PCM. The HARK Cookbook URL below is an example of a SaveWave PCM connection. The IJCAI-PRICAI network file differs in that the separated sound after noise suppression is output, but the connection is such that the separated sound is output as in “Connection example 2”.
https://www.hark.jp/document/hark-cookbook-en/subsec-Separation-002.htmlNote: The IJCAI-PRICAI network file uses the separated sound file output by SaveWave PCM only for confirmation. When converting to features, the frequency domain is calculated as it is, so be aware that changing the gain parameter of Synthesize does not affect the features used in the recognition process.
Use a toolkit called Kaldi to train the model. Kaldi contains a number of sample recipes for learning models with the corpus.
https://www.kaldi-asr.org/
https://github.com/kaldi-asr/kaldi
We use a paid corpus, but there are also free corpus. Fortunately, there are many free English corpus.Note that we are using MSLS features. It is not a general MFCC features. Therefore, we will propose two methods, so please select the one you want.
We have confirmed that using MSLS features is better than MFCC features, so we chose method 2, but the work cost is less if we choose 1.1. Simply replace the MSLS Extraction contained in the HARK network file with the MFCC Extraction and match the feature dimensions to those used by the recipe.
2. Understand the features output by MSLS Extraction and make some patches to the recipes used for learning Kaldi.Work required to prepare training data:
First, the impulse data is convoluted into the corpus data to be used, and the input data that simulates the microphone array coming from various sound source directions is prepared.For method 1:
Next, input the data that simulates the input of the prepared microphone array to the network file, and use the separated sound file output by SaveWave PCM for learning.For method 2:
Next, prepare a network file to obtain the features to be learned. Duplicate the network file you are currently using for speech recognition and make the following modifications: Use AudioStreamFromWAV instead of AudioStreamFromMic. At that time, don’t forget to set CONDITION for the EOF terminal. HARK also has a Save HTK Feature node for saving in HTK Feature format. The feature amount input to SpeechRecognition (SMN) Client is connected to SaveHTKFeature. At that time, set the parameter of SaveHTKFeature to USER.
In the created network file, data that simulates the input of the microphone array prepared first is input, and the output feature amount file is used for training.
Replace the features learned by Kaldi with those output by HARK. Also, match the number of dimensions in the config file related to the features of the learning recipe.
Supplementary explanation: Kaldi has a method of learning while converting PCM data to features, but please do not use Kaldi’s feature conversion function and directly read the HTK Feature format output by HARK for learning. By doing so, the patch that outputs the MSLS feature to Kaldi’s feature conversion program becomes unnecessary.Best regards,
HARK support team.Thank you for your inquiry.
The model we are distributing is a learning of the separated sound of the TAMAGO-03 microphone array. When used with different microphone arrays, at least the difference in the volume of the separated sound input when generating the feature amount causes a decrease in recognition performance. Please try to compare the volume of the separated sound with the original evaluation set of IJCAI-PRICAI and adjust the volume until the performance improves.
Also, if the microphone arrangement is significantly different from the TAMAGO-03 microphone array, the recognition performance may deteriorate because the tendency of distortion after separation is different. For best results, you need to create your own model by learn the separated sounds in your microphone array.
Since it is a language model learned with a large vocabulary, many words can be recognized unless it is a word such as jargon or slang, so a language model with a small vocabulary should not be necessary. If you really need to create your own language model, please use Kaldi’s tools to create your language model. You need to run mkgraph.sh with arguments to the directory containing the “final.mdl” file and the directory of your language model.
Best regards,
HARK support team. - TIME 端子:
-
AuthorPosts